VAAI stands for VMware APIs Array Integration (for vSphere Storage).
VAAI is also referred to as hardware acceleration (or hardware offload APIs), which are a set of APIs to enable communication between VMware vSphere ESXi hosts and storage devices.This APIs are enabled on the ESXi host to offload certain storage operations to the storage array instead of all the I/O operations being handled by the VM kernel.
The tasks that can be offloaded by these APIs are: VM cloning, migrating from one datastore to another, migrating datastore with in the same storage array, etc.
Hardware-assisted locking allows vCenter to offload SCSI commands from the ESX server to the storage system so the array can control the locking mechanism while the system does data updates.
VMware does not support VAAI on VMFS with multiple LUNs/extents if they all are on different arrays even if all arrays support offloading. In this case the vmkernel will handle I/O operations instead of the array.
This tutorial provides instructions on how to enable VAAI and install plugin on your VMware ESXi 5.x servers.
1. Enable VAAI from Command Line
You can verify whether VAAI is enabled ornot from command line using esxcfg-advcfg command.
If the following output displays “0” (as shown below), then VAAI is not enabled.
Code:
# esxcfg-advcfg -g /DataMover/HardwareAcceleratedMove
Value of HardwareAcceleratedMove is 0
Code:
# esxcfg-advcfg -g /DataMover/HardwareAcceleratedInit
Code:
# esxcfg-advcfg -s 1 /DataMover/HardwareAcceleratedMove
Code:
# esxcfg-advcfg -s 1 /DataMover/HardwareAcceleratedInit
2. Enable VAAI from vSphere Client GUI
- Open the VMware vSphere Client.
- In the Inventory pane, select the ESXi/ESX host.
- Click the Configuration tab.
- Under Software, click Advanced Settings.
- Click DataMover.
- Change the DataMover.HardwareAcceleratedMove setting to 1.
- Change the DataMover.HardwareAcceleratedInit setting to 1.
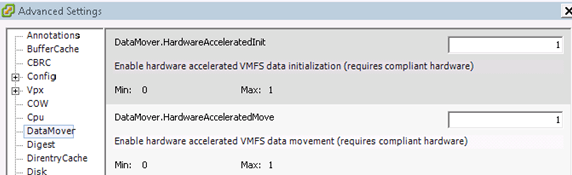
- Click VMFS3.
- Change the VMFS3.HardwareAcceleratedLocking setting to 1.
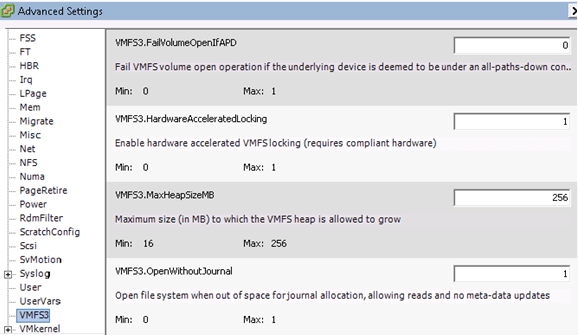
- Click OK to save your changes.
- Repeat this process for the all ESXi/ESX hosts connected to the storage.
3. Verify the Plugin
You can use the esxcli command to verify whether the particular plugin that you are interested in installing is already present. In this example, I’m looking for NetApp plugin
esxcli software vib list | grep -i NetAppFor this example, I am installing the NetApp plug-in for NAS datastores. Download the latest plugin from the vendor website and save it locally. You can also download the plug-in for EMC storage and other vendors from their website.
4. Install the Plugin
Use the following esxcli command to Install the Plugin. As you notice the plugin will have .vib extension.
Code:
# esxcli software vib install -v /NetAppNasPlugin.v20.vib
Installation Result
   Message: The update completed successfully, but the system needs to be rebooted for the changes to be effective.
   Reboot Required: true
   VIBs Installed: NetApp_bootbank_NetAppNasPlugin_1.0-020
   VIBs Removed:
   VIBs Skipped:
After this, reboot the ESX machine for the changes to take effect.
Now, verify that the plugin is installed succesfully.
Code:
# esxcli software vib list | grep -i netapp
NetAppNasPlugin  1.0-020     NetApp     VMwareAccepted    2014-07-30
Verify the NAS datastore already mounted supports VAAI using the vmkfstools command as shown below.
Code:
# vmkfstools -P -h /vmfs/volumes/46db973f-cca15877
NFS-1.00 file system spanning 1 partitions.
File system label (if any): TEMP NAS
Mode: public
Capacity 2 TB, 791.9 GB available, file block size 4 KB
UUID: 46db973f-cca15877-0000-000000000000
Partitions spanned (on "notDCS"):
 nfs:TEMP NAS
NAS VAAI Supported: YES
Is Native Snapshot Capable: YES
6. VAAI Performance Tuning and Monitoring
The default XCOPY (Clone operations) size is 4MB.
With a 32MB I/O, the expectation would be to see this counter in esxtop increment in batches of eight, the number of work items that will be created to deliver a 32MB I/O.
The default XCOPY size can be incremented to a maximum value of 16MB if required, but that should be done only on the advice of your storage array vendor.
While a storage array vendor might suggest making a change to this parameter for improved performance on their particular array, it may lead to issues on other arrays which do not work well with the new setting, including degraded performance.
You can observe the clone operations (XCOPY) in esxtop output. To see this output in esxtop, first select u for device view and then f to change which fields are displayed. Options o and p display VAAI statistics. Each primitive also has a column for failure statistics, that is, CLONE_F, ATSF and ZERO_F. These should be monitored for any failed operations.
Execute the following esxcfg-advcfg command to query the current transfer size:
Code:
# esxcfg-advcfg -g /DataMover/MaxHWTransferSize
Code:
# esxcfg-advcfg -s 16384 /DataMover/MaxHWTransferSize
Value of MaxHWTransferSize is 16384
7. Check the status of VAAI
Use the following esxcli command to display the status of VAAI along with all installed plugins.
Code:
# esxcli storage core device vaai status get -d naa.xxxxxxxxxxxxxxxx
naa.xxxxxxxxxxxxxxxx
 VAAI Plugin Name: VMW_VAAIP_NETAPP
ATS Status: supported
Clone Status: supported
Zero Status: supported
Delete Status: supported
Comments
Post a Comment